Thursday, June 25, 2009

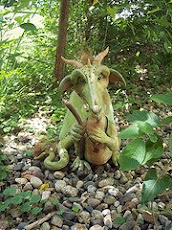
Shalot the Key Keeper


Meet Shalot the Key Keeper. She is a very shy girl and loves her keys. I have no idea where she finds them but more and more appear in her possession all the time. Sure wish she could have found my Mustang keys a while bag. Like Geico, she could have saved me a lot of money!!
She stands nearly 18" and is built over a foil and wire armature.

Color comes along

Very slowly color is finally starting to appear on the tiles. When ever I have a minute or two I pick one up and give it a coat or two. While I was working on Shalot I painted tiles as sections baked. One day it will finally be done... I'm not holding my breath.

Wednesday, June 24, 2009

Mosaic with Scrap Book Paper


This picture isn't the greatest but it gives an idea of what I was talking about in some earlier e-mails to clay friends. The canvas board, base, is covered with scrap book paper using a spray on glue. Then the tiles are applied, leaving part of the paper exposed. The slightly crooked clock hands are clay also. Sure wish I had seen the nice metal ones Michael's has in the scrap book area before hand!!

Wednesday, June 17, 2009

Joint Project and New Class


I was working away on Summer Got You Dragon...new mixed media class over on http://www.polyclayplay.com/ (Go check out Trish's sight! Lot's of cool stuff to see and explore...subliminal messaging now over) when the postman brought me a wonderful surprise. A dear friend of mine knew how much I love Where the Wild Things Are and decided to sculpt Max just for little old me. It was amazing how he fit right into the scene with her not knowing what I was working on! How cool is that?! Anyhow, the wonderful friend and artist who created Max is Pat Jones... http://www.mothermadebypatjones.blogspot.com/ She makes incredible teeny tiny fairies, babies and elves. There is one she did eating a cupcake that I adore!


Go here to see her work.


Anyhow...the new class over at Trish's sight is a fun summer mixed media piece. You will learn how to do all the sculpting, add foliage and work with resin. Shoot, there are even little goldfish in the water! The class starts July 18 and runs for four weeks (I think...) This is the first in a series of four seasonal mixed media classes. If you sign up before the end of June there is a fun Bonus project titles "How to Pickle a Dragon" for free! Can't beat that. Hope to see you there...well OK at least chat with you there!


To Long Gone


It has been way to long since I have left a mark here in my little corner. Somehow life keeps getting in the way. Here is a little sneak peek at a work in progress and a couple that are done. I really enjoy mosaics. They are so much like puzzles I can't help but to want to sit for ages and cut tiles then see if I can put them together. Sigh...alas that isn't what I get to do! It takes me forever to get one done. Normally I only get to cut, bake and paint tiles in between other things. So...while that crazy dragon is in the oven I cut tiles like a mad woman......ha ha ha...evil laugh...

Saturday, March 28, 2009

I Got a New Puppy....sort of


Poor Floyd, he is just to goofy for his own good. He can't even seem to keep his drooly tongue in his mouth. Maybe that is because he is so happy! He really likes to play with his beat up ball and chew on his bone. I think I might have to keep him...

Tuesday, March 17, 2009

Lazy Louie...


Meet Lazy Louie...I sure envy Louie. Wish I was out laying in the sun with nothing better to do. Little does he know, I just listed him on etsy so he might have to get up and get moving soon. Then again...

Sunday, March 15, 2009

Happy Spring!


Today has finally been a spring-like day. There are Robins all over the yard and the temp is near 60! Woo hoo! While I was walking around the yard looking for a sign of green I came across this little girl and her clutch of eggs. She was so proud that she picked one up to show me! I wished her luck and went on my way.

Friday, March 13, 2009

Wow! I'm teaching my first online class!!


Meet Eureeka!


Eureeka is 11" tall and has a ball jointed head. She can look all around and even tell you "No!" if she doesn't like where you sit her to gaze out the window. The class for how to sculpt her will begin on April 4th. Go to: http://www.polyclayplay.com/Adventures/index.htm for all the nitty gritty. I can tell you from what I have seen, Trish has done a spectacular job setting everything up. If you are interested in joining us, Trish, Eureeka and myself, for a 4 part class on making Eureeka head on over to Trish's sight (link above) and sign up! We would be thrilled to have you.


Magellan - the naughty dragon!


Magellan is an example of when a good dragon goes bad! This poor guy faught me tooth and nail while I was trying to sculpt him. From being burnt to his head falling off...what a nightmare. Anyhow, here he is in all his naughty glory. Doesn't he have that "Who me?" look...

He is about 12" tall and long. His insides are a foil core and his wings are painted fabric. It is amazing how light weight these big guys are! I better get him a collar and leash before he runs off.

Maureen Carlson


Many times I have been asked how I got into polymer clay. I have two words for them "Maureen Carlson". I was a porcelain doll maker for a number of years and would get discouraged always pouring other people's artwork. Then I managed to get a copy of "How to Make Clay Characters" by Maureen Carlson back in the late 1990's. My love of clay was born. I have all of her books and always recommend them to anyone who asks me about working with clay. Many of the techniques that I use creating my dragons I learned from Maureen's teaching me through her books. Maureen has a wonderful new line of molds, for those of us who are human challenged when sculpting. They are called Puzzle Face Flexible Molds. What a joy they are! The molds are everything advertised and more. If you have never heard of or seen them check them out... http://www.weefolk.com/molds_list.htm


I have never had the pleasure of going (It is definately on my wish list!) to her Center For Creative Arts. If you live any where near Jordan, Minnesota chck it out http://www.maureencarlson.com/ Then you can tell me all about it and I can be green with envy!!


Christi Friesen


I thought maybe it would be a good idea to share with anyone who stops by my little corner some information about those artist who inspire me. Christi Friesen is a very imaginative clay artist who never seems to amaze with the variety of pieces she creates. From steam punk to just plain adorable, there is something for everyone. If you are new to sculpting or been at it longer than you want to admit her books and tutorials are perfect for any level. I have always been a fan of her turtles. They all have such wonderful character, colors and style. From personal experience, I can tell you Christi is a super friendly lady who takes time to answer and encourage those who seek her out. I went outside my box, some time ago now, and sent her an e-mail telling her how much I enjoyed her books. Shortly there after I had an encouraging response and invitation to join her Yahoo group. What a fun group and place to meet other clay folks! If you aren't familiar with Christi's work I encourage you to take a look at her sight http://www.cforiginals.com/ You will be glad you did!!


Saturday, March 7, 2009

Hey! That's not a dragon!


Here's something a little different. I really have fun making these little gold fish jars. This one is Fred and Bob's new home. The jar used to house salsa but no more. Now it is Fred and Bob's domain...forever... because that water is resin and there is no way they can get out...ha ha ha...evil laugh...
I just wish I had rembembered to put a lip of clay around the top of the jar. Oh well, maybe some wide black ribbon would work folded over the top to cover the screw on part. Off to play...

Finally got etsy going again!


I have finally re-stocked my etsy store. Mr. Dragon or better known as Flynn from the tutorial is up for adoption and so is Eco. I forgot how much time it takes to do all of that loading and waiting. Half the day is gone. Oh well, it is rainy and dreary so might as well be inside on the laptop!

Saturday, February 21, 2009

Loki


I took Loki out for some new pictures this afternoon and thought I would share a couple. The other pictures didn't do her justice.

Thursday, February 19, 2009

Painting the Little Griffling

Wanted to update how to finish the little griffling. Unfortunately I'm having tech problems again! This time with my wonderful, clear my throat, 17 year old son. He took the memory card out of my camera, wiped it, put it in his camera and I now have tons of skate videos and pics. As great as they are they aren't going to help anyone finish a griffin!! So, here goes the short and sweet of it with no pictures. Hey, your all creative people I know you will get how to do it. Paint him with washes just like the dragon. Dry brush two to three colors working from darkest to light. On browns I normally dry brush with a cream or white last. Apply sealer. You can use marabou feathers if you didn't make clay feathers. That is what I did with little Stormy. I will try to get a couple pictures of him posted soon. Right now I'm fighting a nasty cold/sinus infection so pictures may wait a couple days. Excuse me...can't stop sneezing!!! Enjoy your new griffling.

Monday, February 16, 2009

Paint and Finishing

Tomorrow I will post the last part of the tutorial all about painting and finishing him up. Right now my fingers are tired of typing! Enjoy!

This is the end...


The tool that I am using in the first picture is made by Makin's Clay. It is a wire brush attachment. If you don't have one of these, you can easily make a fur tool. I also use the ones I have made. These are made by cutting lengths of wire and inserting them into a clay handle, bake tool and use! Brush your fur tool over the body to create a fur like texture. Don't brush his front legs or head. Take a good look at him and make sure he is to your liking. Don't worry about little clay tufts or rough spots. these can be lightly sanded off after baking. If so he is ready for the sauna! Bake him at the correct temperature and time for your clay. I bake t 275 degrees for about an hour. Th e wings only bake for about 20 minutes. Oh, a note on the wings...if you are using clay feathers don't forget to add some to the wings!! Off to the sauna...

I'll Fly Away...and steal your cookies!!


Roll out a sheet of clay on the pasta machines thickest setting. Double the clay over lightly and cut out a wing shape. Smooth the edges and slightly roll over the top edges to add some interest and curve. Cut two pieces of wire about 1", I believe mine is 20 gauge. Fold the wire over in half and pinch the ends together with some needle nose pliers. Put a dot of TLS on the inner edge of the wing and lightly mash the wire into the TLS. Take a small dot of clay and cover the ends of the wire. Smooth clay in seamlessly. Repeat for other wing. Now poke holes in the the griffins back and test how the wings will sit. If they need to be trimmed or repositioned now is the time to do it.

Feathers


Stormy isn't going to be covered with clay feathers. If you would prefer to cover your guy with clay here is how to do it. Roll out a sheet of clay on the pasta machines thickest setting. Cut little squares 1/2" long by 1/4" wide or somewhere around there. Doesn't need to be exact! Now form into a little feather shape and use the needle tool to apply the line work. Use a bit of TLS and apply the feather in rows starting at the lowest point and working up. Even though you are working in rows try not to make it look like ROWS. You do want a bit of a random look to it not a pattern.

Another Test


Lay the front leg against the body and cut off at the proper length. Round off the end of the leg and create a tapered slope where it will attach to the body. Use the small needle tool to add texture to the foot and leg. Put a dab of TLS on the top back of the leg before attaching. Now lightly press onto body and smooth top. Pose his legs into a pleasing position. Stormy is going to have his foot propped on something.


More Toes


Cut the front section of the foot into three sections. Roll each of the toes out into nice long toes. Now cut them off! No, not the whole thing but trim down so they are proportionate to the foot. Round the ends off and smoosh them back a bit to plump them up.

Chicken Feet


Let's get technical...smoosh the clay down on your work surface and start forming a triangular shape at the end of the foot. Oooo, triangles! Finally got away from those teardrops!

Chicken Legs...mmmm


Logs, logs, logs. I'm starting to think my method should be called the Log, Pinch and Roll Method! So with that said make another log, long and thin this time. You want the log to be a little thinner than your thumb. Now cut it into two sections about 3" long.

Attaching Those Legs


This is what the finished legs look like. Don't forget those important tabs on the bottom of the thigh. They really do help secure the joining of the limbs. Brush a little TLS on the inside of the thighs and then press on to the body. Flip him over and smooth the tabs into the underside. If you would like paw pads on the bottoms of his feet you can add those to.

This Little Piggy...oh yeah...griffling


To form the foot cut off the excess clay and round off the end of the foot. Use the small needle tool and mark in three toe lines. That will make four toes. Smooth the toes out to make them rounded like cute little piggies should be. To finish the toes/foot off use the larger needle tool to create an indention behind to the toes. This makes the toes stand out a bit and adds some plumpness to the foot. Remember, he's a baby plump is cute!